Not that I'm excited, but how did you like that cool weather yesterday? Wiley and I went out early in the morning and it was 45 degrees. It felt so good to be a little chilled, actually it felt REALLY GOOD.
Well today is Tuesday Technique, so let's make a Box in a Bag or Bag in a Box....Either way, it's really cute and so easy.
Let's Make a Box In a Bag
Supplies you will need
- Gilded Autumn Suite or Beautiful Autumn Bundle
- Early Espresso Card Stock
- Mint Macaron Card Stock
- Very Vanilla Card Stock
- Early Espresso Classic Ink Pad
- Mint Macaron Classic Ink Pad
- Gilded Autumn Designer Series Paper (if you purchase the suite, this DSP is included, along with the ribbon.
- Celebrations Label Dies
- 3/4" punch (retired)
- Tear and Tape
Step by Step.
STEP 1
Cut your Early Espresso Card Stock to 4 1/2" x 4 1/2". The dash line is the score line,
1" on all sides. The red line is the cut line, the diagonal red cut line makes it easier to put together.
STEP 2
Attach the Tear and Tape to the corners as shown in the diagram below. Create the box which is
the bottom of the bag in a box.
This is the bottom of your box/bag and will look like the picture below.
STEP 3
Cut your designer series paper to 5 1/2 x 11". This is the reverse side of what your pattern
will look like, but you need to add Tear and Tape to the bottom of the 11" side
and one of the 5 1/2" sides as shown in the picture. (Just an FYI, I forgot to take a picture
of the front side, but you'll see it soon.
STEP 4
Remove the strip of tape from the bottom of the DSP and wrap it around the box, making sure the bottom is lined up, Also, make sure to start the DSP in the middle of the card stock box, this will create the back of your box/bag.
Then remove the tape from the 5 1/2" side and attach the 2 ends. Your Bag/Box will look like this from the top.
STEP 5
Cut a piece of Early Espresso Card Stock 1" x 11".
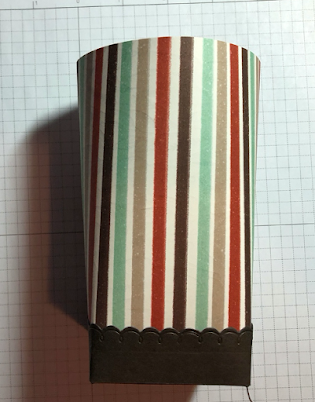
Then using any scallop punch or other border, and die cut one side as shown in the photo below. I used the scallop die from the Prized Peony Dies.
Add 2 strips of tape to this piece of card stock.
STEP 6
Now we need to attach this piece to the bottom of the box/bag.
STEP 7
To create the tabs for the ribbon at the top of the box, I used the smallest Celebrations Label Die and
die cut 2 in Early Espresso, fold them in half and punch a hole close to the fold, then attach to the
center of the front and the back. Remember the back is where the seam is.
STEP 8
Cut a piece of ribbon 20" long and thread through holes. Once you have added your goodies inside, you
can tie the ribbon,
STEP 9
To decorate, I used 3 of the stamps from the Beautiful Autumn Stamp set and punch them out with the coordinating punches, I stamped them using Early Espresso Classic Ink and Mint Macaron Classic Ink.
Punch out three 3/4" circles and attach the stamped images to the circles with dimensional. Attach the circles to the front of the bag using the Tear and Tape or Multi-Purpose Glue.
OH MY GOODNESS I HOPE THAT'S ALL THE STEPS. SOME OF THE ITEMS I USED WERE RETIRED LIKE THE 3/4" PUNCH, BUT ANY PUNCH WILL WORK. I ALSO USED A REGULAR HOLE PUNCH TO PUNCH THE HOLES IN THE TAB. AND HERE IS OUR CUTE LITTLE BOX/BAG.
And here are all the supplies you will need to make this box....or be creative and make one of your own. Send it to me and we'll publish it on Friday on the Fun Friday Post. Please remember Stampin' Up! product only. Because that's the only language I speak.
Also, if you prefer to buy the bundle and not the suite, the Bundle is item # 155189 for $50.25
If you would like to purchase any of these items, please SHOP HERE. Also if you have any questions, please don't hesitate to contact me.
Also, don't forget, today's the day....the Stampin' Cut and Emboss Machine is now available along with the magnetic plate. YEA.
Also, this is a great opportunity to join Stampin' Up!.
Get 2 FREE stamp sets and enough cut card stock to create 16 cards plus $125 worth of Stampin' Up! product for only $99.
E-mail me if you'd like more information. My e-mail address is
LDEstampin@yahoo.com
Wiley says hi and he'll see you all tomorrow. Have a great day everybody
Love and Blessings
Lynda and Wiley the Wonder Dog M.D.


Gorgeous!!
ReplyDelete