Monday, November 30, 2020

On The First Day of Christmas.....the Warm & Toasty Stamp Set Gave To Me a Simple Card for all to see.

 This cute little Polar Bear.....Really Simple Card 

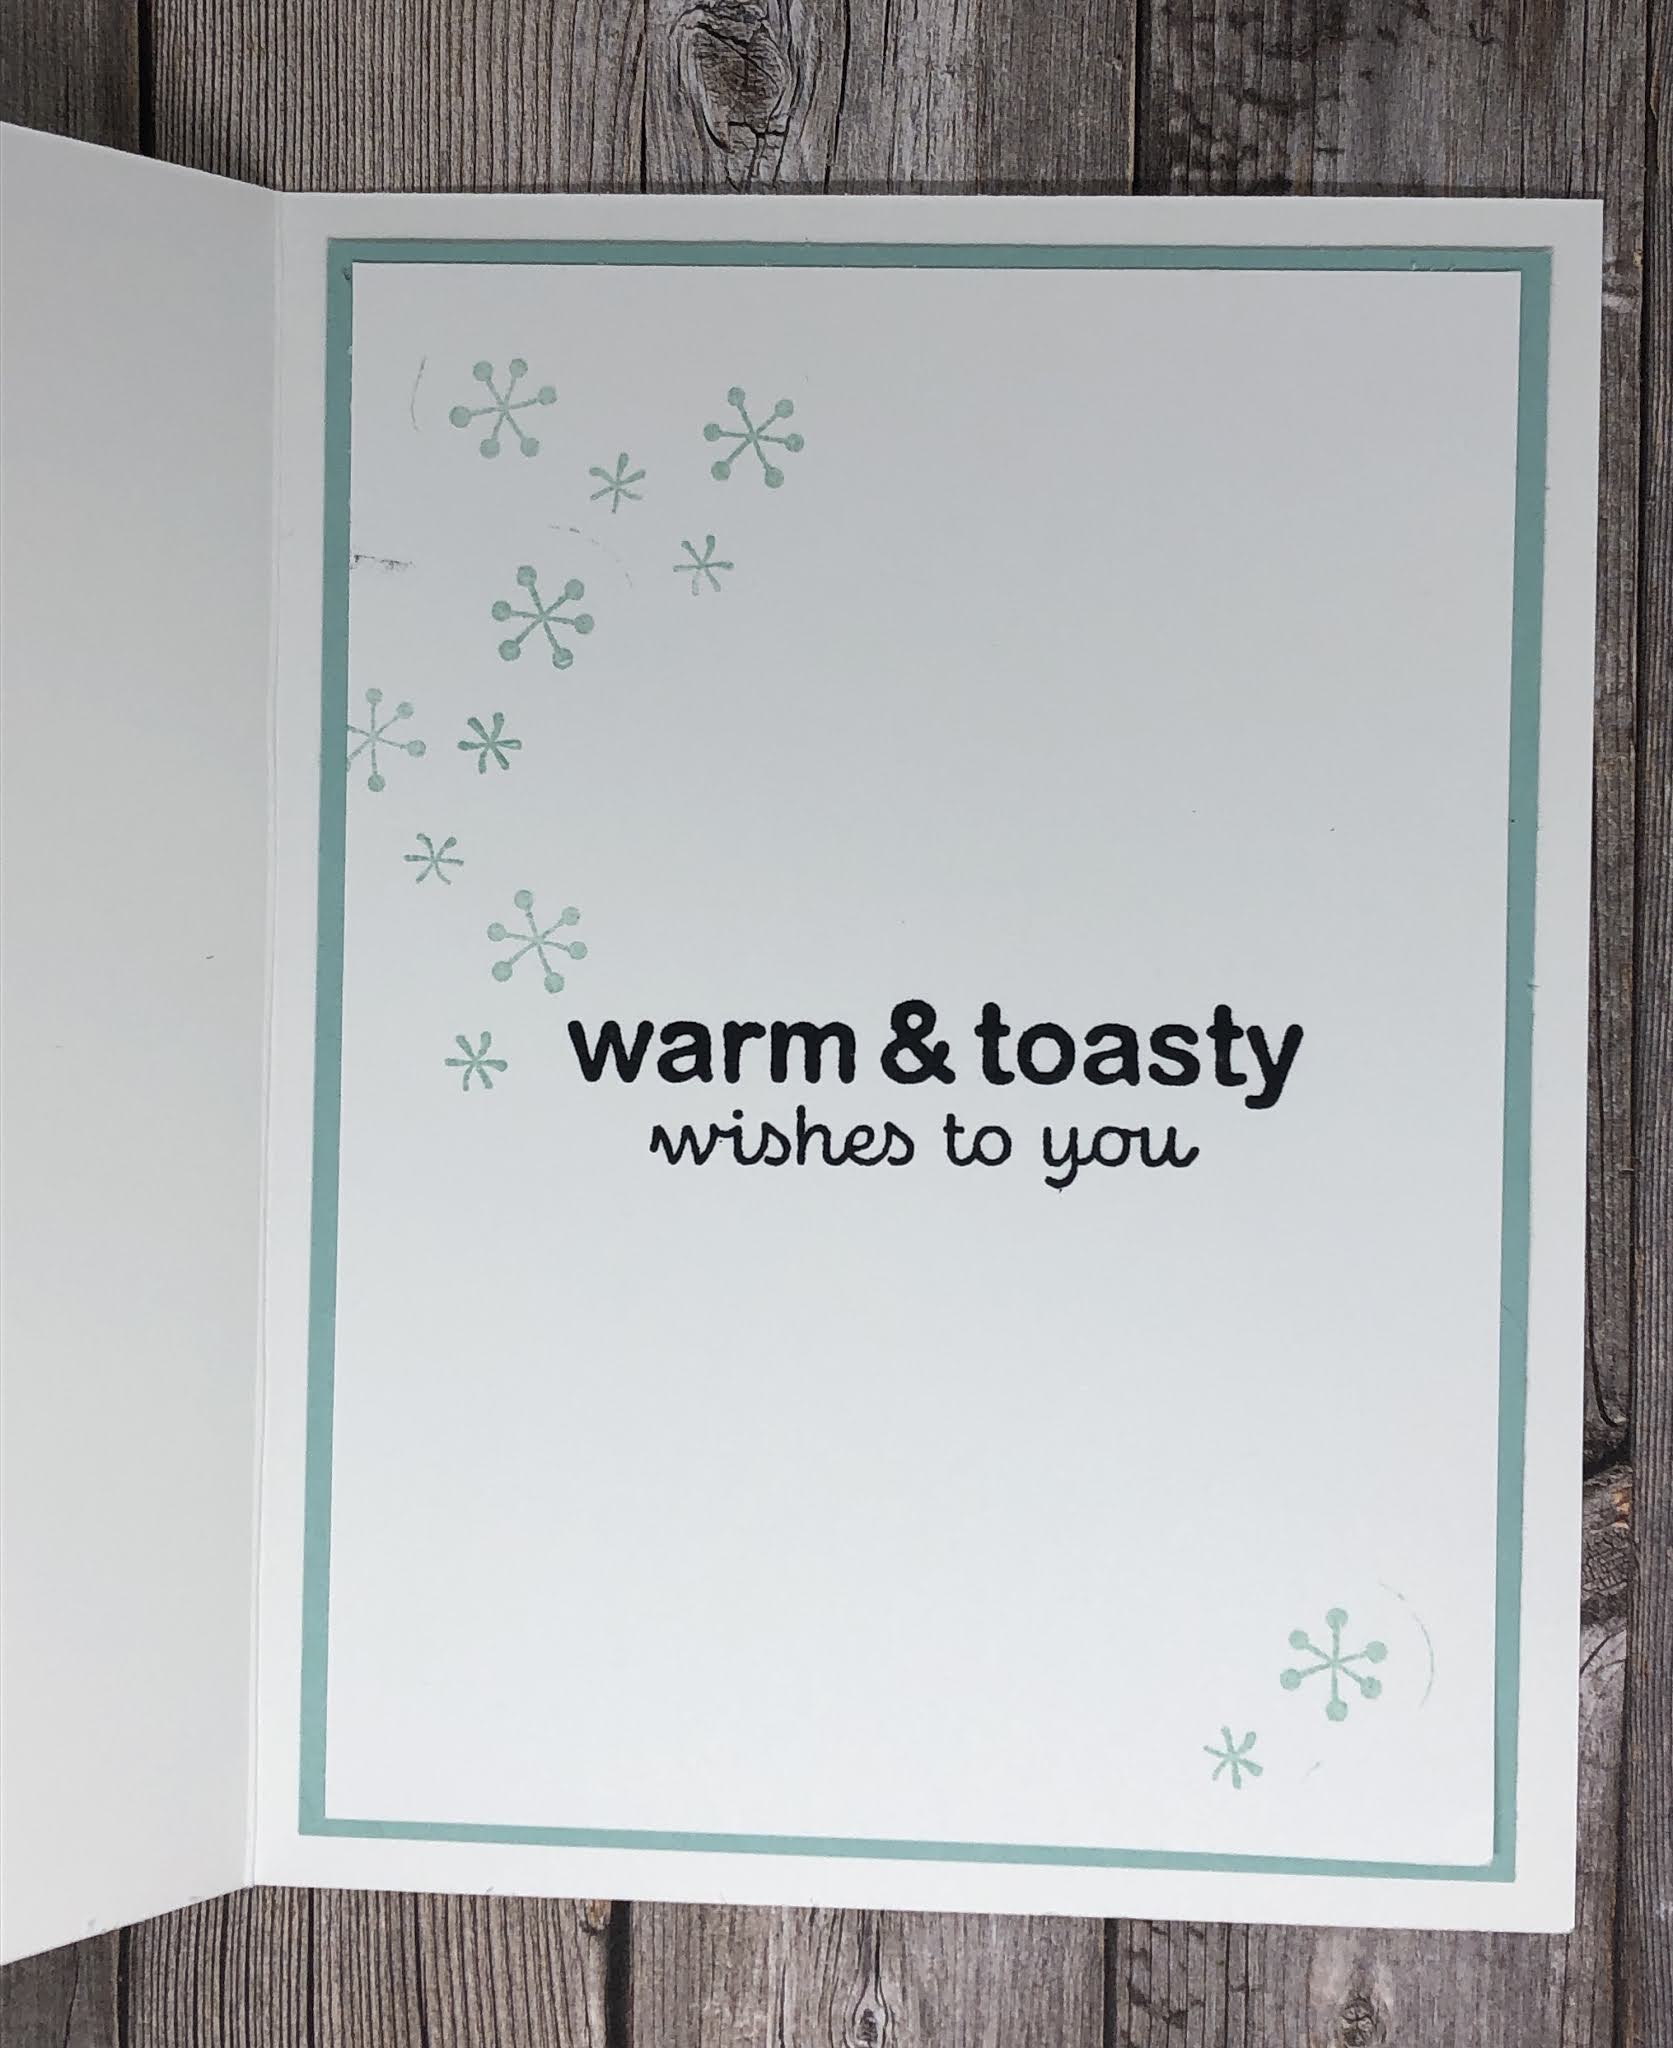
The Warm and Toasty Stamp Set is in the August-December Mini Catalog.

Here's what I did. Base of the card is Thick Whisper White 5 1/2" x 8 1/2" scored at 4 1/4". Then the Pool Party Card Stock is cut at 3 7/8" x 5 1/8" and adhered to the card base with Stampin' Seal... the card front is Whisper White 3 3/4" x 5" and embossed using the Winter Snow Embossing Folder. The circle is from the Snowflake Splendor Designer Series Paper. and the largest Stitched Shape Circle. The snowflakes are die cut using the So Many Snowflakes Dies and the Glimmer Paper is retired, but you could use the Balmy Blue Glimmer paper found in the August-December Mini Catalog.

Stamp the little skating beat with Memento Tuxedo Black Ink and then color the scarf and hat with the Pool Party Stampin' Blends. Cut him out using the Stampin' Snips and attach him to the circle with Stampin' Dimension.


If you'd like to order any of these items, pleases stop by my store HERE


Have a great day everybody and blessings
Lynda and Wiley the Wonder Dog M.D. 


Thursday, November 26, 2020


My Blessing Today on this Thanksgiving Day

For each new morning with its light
For rest and shelter of the night
For health and food,
For love and friends
For everything Thy goodness sends.
Ralph Waldo Emerson

Ric, Wiley and I want to wish you all a very blessed Thanksgiving.

And on this Thanksgiving day please take a moment and thank 
God for all the blessings you have been given. 
I know Ric and I will take that moment and thank you all for being a part of our lives 
and the blessings you are to us.  


Tuesday, November 24, 2020

Tuesday Technique Let's Make a little Christmas Box

 Let's Make a Snowflake Mini Box


Here's another view.


And here's how we made this cute little box.

Cut a piece of Designer Series Paper of your choice 4" x 8" and score at
1/2", 3", 4 1/4", 6 3/4"
Then to make the bottom of the box. score at 1" from the bottom.
Here is a diagram that shows where the score and cut lines are.

Using the 2 5/8" Layering Circle die, Cut out 2 coordinating circles. 
Then using the 1 1/2" punch, cut out 2 circles. (these are only used to show you the center so the color of the paper doesn't matter.
Here is another picture to show you the circles.

Attach the circle to the larger portion of the box using the adhesive of your choice *****Make sure to only add the adhesive to approximately 1/4 to 1/2 of your 2 5/8" circle as the top half will be the handle.

Attach the 1 1/2" circle to the center of the 2 5/8" circle using a glue dot as you only want it to hold it in place to show the center. Then using the 1 1/2" circle punch, punch out the circle. This will give you he hole for the handle.

Add Tear and Tape or the adhesive of your choice to the 1/2" end and the bottom to create the box. 
And now the fun comes, decorate it however you'd like. 

If you have any questions, please don't hesitate to ask, my e-mail is LDEstampin@yahoo.com

Monday, November 23, 2020

Monday Movies and Merry and Bright Online Extravaganza YEA

 Quite Curvy Bundle

This special is only available through November 30th, Then The Quite Curvy Bundle won't be available until the Mini Catalog in January. 

Friday, November 20, 2020

Friday Fun Day - and Pumpkin Roll Gift Boxes


You're Gonna Love Tuesday, November 24th. It's all about the 
Merry and Bright Online Extravaganza
Almost everything in the 2020-2021 Annual Catalog is on sale
There are some items that are NOT included and I'll list them on Saturday. But Oh My Goodness, 
I'm so excited. 
More information coming

Wednesday, November 18, 2020

Wednesday's With Wiley's World.

 Hi Everybody

It's me Wiley the Wonder Dog and I wanted to show you a picture of me and how Exhausted I was on Tuesday Night. 


First mom made some cute Christmas projects, which was easy, because I cut and scored everything and all she had to do was glue them together. how simple is that I ask.


Aren't these cute. It's  a Stack-A-Package....which means there are gonna be 3 presents in there for me. 

And I know mom showed you the little tiny boxes and here they are again. 


Well after that, we went to Our Beautiful Sand Creek for a walk. We saw these beautiful clouds and dad said he's happy he's not up there flying, but here are the clouds I took a picture of and I'm sure you'll love it.


Aren't they beautiful? Mom said I took a really great picture. But then what do you know. 
We came home and mom decided to make pumpkin rolls for her friends at Children's Hospital.. 
She made 7 of those things and it took her all day, which means I was in the kitchen measuring and cracking eggs and getting them out of the oven and trying to roll them up so they could cool and then making the cream cheese filling....oh my goodness, I was exhausted. That picture at the top of this blog is me last night. 

Well that pretty much was my day yesterday. I know mom will have some Stampin' Up! news for 
you and I'll check it over to make sure she doesn't goof.

Have a great day and mom and I which you many blessings and love you to pieces.

Wiley the Wonder Dog M.D. 
and my mom.

Tuesday, November 17, 2020

Tuesday Technique Cute little Christmas Boxes....

 Let's make a little, little box.

And believe me, this is the cutest little box
First I'll show you the box and then I'll explain the mechanics. 
The first picture is the box flat on the wood, 
The Second one is the box standing up. 


How cute is this? And now here's the mechanics....So Easy


1. Cut a piece of Designer Series Paper 6" x 6" and score 1 3/8", 2 3/4", 4 1/8" and 5 1/2". 
2. Add tear and tape to the 1/2" piece. Score the bottom of the box at 1 3/8". 
3. Note the 1/2" on the bottom of the box is cut. Now you can tape it together. 
4. Pinch the top of the box and punch a small hole in the top to add the ribbon. 
Decorate your box however you would like based on the designer series paper you choose. 
for mine, I used the berries from the Poinsettia Dies and the greeting from Itty Bitty Christmas.
Make it as festive as you'd like. You can also add name tags to the top and use it as Nut Cups for your Christmas Dinner. 

Wait till tomorrow when Wiley shows you the cute little gift boxes he helped me make.....
I had to do the cutting, and scoring and taping, but believe me he was very helpful.

Thursday, November 12, 2020

Thursday's Thoughts Stampin' Up! Style


I  think this is gonna be a really cute Paper Pumpkin and one you shouldn't miss. 

KIT DETAILS

December’s Paper Pumpkin kit includes enough supplies to create 12 cute and 
cuddly bear-themed cards. 
The kit also includes 12 coordinating envelopes.
This month's kit offers a warm way to send a socially-distanced bear hug to friends and family near and far away. To receive the kit, subscribe by December 10th HERE 

Wednesday, November 11, 2020

Wiley World's Wednesday

 Hi Everybody

It's me Wiley the Wonder Dog and boy have I been busy. 


Okay, it was kind of scary too. Sure enough, the 4th of July has been over for a little while and what do I hear last night? Either fireworks or guns. So needless to say, I had to hide under my pillow. Well fortunately the noise didn't last long and I did get to sleep a little while last night. But that didn't help me when I had to do some stampin today. Mom had to go to the dentist and get her hair cut, so she was gone most of the day. So, here are some really simple cards I made using one of the new stamp sets coming in the January-June Mini Catalog. The stamp set is called "Enjoy the Moment" . Remember, don't tell mom because we're not suppose to show you these yet. 


Do you think they're a little cute? Mom does too and I know she's gonna make me stand in the corner all day for showing you these. But I had fun making them and since I'm a beginner, I think they look good and they were REALLY EASY.  There isn't any ordering information yet because we can't order them yet.

Tuesday, November 10, 2020

Technique Tuesday----

 Let's talk about the Silicone Craft Sheet - #127853 - $6.00

1. place a small amount of Multi-Purpose Glue on your Silicone Craft Sheet


2. Turn the piece you want to add the adhesive upside (which puts the part you want to glue on the top. 


3. Add some of the Multi-Purpose Glue to the sponge and then pounce on the object you are working with.


4.Attach the piece to the paper and sure enough, no message on your project. It's like magic.


5. Once the glue has dried on the Silicone Craft Sheet, you can peel it off with your finger and it's ready for your next project. 

How simple is that? 

If you'd like to order the Silicone Craft Sheet, click HERE

Monday, November 9, 2020

Monday Movies

 The Monday Movie Features the Quite Curvy Bundle You're gonna love this movie....Get your popcorn ready and enjoy.


And here's what you get.
The Quite Curvy Stamp Set
The Curvy Dies
ΩThe Curvy Christmas Stamp Set
Classic Christmas 6x6 Designer Series Paper
All for ONLY
 $70.50.

Believe me this is a deal you can't miss. it's 10% off now but in 
December it will go to it's regular price.

Saturday, November 7, 2020

Where have I Been? Onstage at Home of course

 Hi Everybody

I'm sorry I've been MIA for the last two days. I've been attending Stampin" Up! OnStage at Home and learning and seeing lots of new products. 

I want to share some cards I created today during OnStage....believe me I am so out of my comfort zone with these cards. These are from the Stampin et Dragonfly Garden that comes with a Dragonfly Punch and some Mossy Meadow Twine and really cute lady bugs as shown on the green card....I'm so looking forward to sharing these products with you.


These products are not available to purchase yet, but wait till December 1st, then we're off and stamping. 
I used mossy Meadow, Blackberry Bliss and Misty Moonlight....plus the coordinating Designer Series Paper.  Shown Below

And Oh My Gosh....Look at those little Lady Bugs on theMossy Meadow Card. Too Cute!


Today at OnStage At Home was so much fun....and we learned so much and saw so many new products....Wait till you see it! 

This next picture shows my little helper. When I would get stuck, he helped me figure everything out. He's such a good boy. 

He was sitting obnoxiously the plastic container that I sit my feet on. He wasn't there long, just long enough to help me eat my lunch....which was a little different than when we're live and close to the 5000 other Stampin' Up! Demonstrators

Well I hope you all have a good day and we'll see you tomorrow.
Have a great day.
Love and blessings
Lynda and Wiley the Wonder Dog M.D. 


Tuesday, November 3, 2020

In The Pines Card Sample

 Today I have a sample of another card we'll be creating during our virtual class this month. I've used the In The Pines Bundle along with the Dies from the Joy Dies.


Since we're not meeting in person, I tried to create a card with no stamping. 
(Although I did do a little stamping on the inside). 


The product I used are shown below.


Instructions:

1.     Cut a piece of Crumb Cake Card Stock to 5 ½” x 8 ½” and score at 4 ¼” 

2.     Cut a piece of Mossy Meadow Card Stock 3 7/8” x 5 1/8” and attach to the Crumb 

      Cake Card Base using Stampin’ Seal

3.     Cut a piece of Crumb Case 3 ¾” x 5” and emboss using the Soft Subtle 

       Embossing Folder. 

4.     Cut a piece of Cherry Cobbler 1 ¼” x 5” and then die cut the right side 

      using the Ornate Border Dies, attach this piece to the right side of the 1 ¼” x 5” 

      Plaid Tidings Designer Series Paper and then attach to the left side of the 

      Embossed Crumb Cake Card Front. 

5.     Die cut the word Peace from the Joy Dies and attach it to the Plaid Tidings 

      Designer Series Paper with the Fine Tip Glue. 

6.     From the In the Pines Bundle Die cut the large tree in Mossy Meadow and 

      attach to the right side of the card front using Mini Stampin’ Dimensionals. 

7.     On the Inside of the card, attach the second piece of 3 7/8”x 5 1/8” Mossy 

      Meadow Card Stock.

8.     On a piece of 3 ¾” x 5” piece of Whisper White Card Stock, stamp some of the 

      Trees from the In the Pines stamp set on the bottom left side. (or the stamp set 

       that you have). I stamped the trees using Mossy Meadow Classic Ink and then  

       color using Blender Pens or Wink of Stella.