Poinsettia Petals
This is one of the cards we'll be making in our September Classes. It's called a Criss Cross Card. (I promise by the time I get done with this tutorial, the card will have an inside.
Criss Cross Card Tutorial
(Please Note....The Designer Series Paper in the tutorial is not what I used in the card. That would be a little weird.)
Step 1
Cut an 8 1/2" x 11 piece of card stock to 4 1/4" x 11" (You'll need both pieces to make this card.
Step 2
Score both 4 1/4" x 11" pieces of card stock at 5 1/2". On the illustration below, it shows how to cut the diagonal cut on the card. This leaves the center of the 2 pieces to be attached together with tear and tape.
Step 3
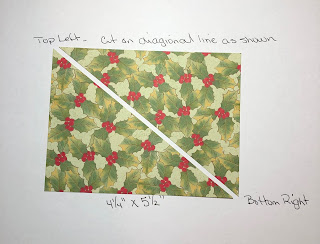
Using the designer series paper of your choice, cut a piece of 4 1/4" x 5 1/2" diagonally. Place the left top side and the bottom right side on the plate to cut the paper. This will give you the use of both pieces. If you place the left side bottom and the right side top on the blades, you will only get to use one of the sides. (See diagram below)
Step 4
Attach the Designer series paper to the left side of the card. The dimensions for this piece is 4 1/4" x 5 1/2" Cut as indicated in Step 3. You can create 2 cards with these pieces.
Step 5
Once you have attached the Designer Series Paper to the left side, you need to decide do you want the entire diagonal piece to show or do you want to overlap the right side and only get a portion.
Whichever you decide, you now need to place a thin strip of Multi-Purpose Glue to the inside bottom of the card and lay the diagonal piece down. The card above, the right side is laid down first and the left side is on top so I could see the entire piece of the Designer Series Paper. (You can also emboss the right side of the card as shown on the card I created. Again using the Multi Purpose Glue, run a stream of glue to the bottom of the top diagonal and a little on the tip to hold it down.
Step 6
Using the Stitched Rectangle dies, cut a piece of Whisper White Card Stock using the rectangle die that is 3" x 4 3/8. On the right side, stamp the sentiment from the Dove of Hope Stamp set (or the sentiment of your choice) in either Real Red Classic Ink or you could use Old Olive Classic Ink. Set this piece aside.
Step 7
Stamp one of each size of the Poinsettias from the Poinsettia Petals Stamp Set with Memento Tuxedo Black Ink on a piece of Whisper White Card Stock . Then color these with Light and Dark Real Red Stampin' Blends. Glue each piece together with the Multi-Purpose Glue, set this aside. Attach one of the Beaded Pearls to the center of the Poinsettia using Glue Dots. Then stamp 3 of the largest leaf using Memento Tuxedo Black Ink and color these using the Light and Dark Old Olive Stampin' Blends. Cut these out using the coordinating Dies from the Poinsettia Petal Dies.
Step 8
Using scrap pieces of Gold Foil paper, die cut 2 of the berry dies from the Poinsettia Petal Dies.
Step 9
Attach the Poinsettia Petal on the left side of the rectangle Whisper White Card Stock. Make sure you can read the sentiment on the right side. Add the leaves and Berries as shown in the sample picture.
Step 10
Attach this piece to the front of your Criss-Cross Card with Dimensional's.
Step 11
To create the card to write your message on, Cut a piece of Real Red 3 3/4" x 5". This could vary, cut your card stock a little big and then trim until it fits. This is mostly because of the Multi Purpose Glue could have spread. Then cut a piece of Whisper White Card stock 3 5/8x 4 7/8 (or 1/8" smaller than your Real Red Card Stock. Stamp the Berries on the bottom left with Memento
Tuxedo Black Ink and color the berries with the Light and Dark Real Red Stampin' Blends. I traced over the stems with Dark Old Olive Stampin' Blends.
The inside of the card is very simple and this could be a little different for the upcoming class.
Step 12
Your Card is Finished, and I'm sure BEAUTIFUL.
I will have the Criss-Cross Tutorial for the upcoming class what will make it easier to follow.
Have a great day everybody and I can't believe I'm saying this with it being 90 plus degrees today, but stay in and stay warm......YEA....Cool Weather.
Just a little note from Wiley the Wonder Dog M.D.
Hi Everybody
I wanted you all to know that I help mom and dad winterize everything. I had to drag planters under the porch, then I had to put a tarp over the Hydrangeas and roses. It was a really busy day. Fortunately dad went under the house to turn off the water because I'm afraid of all those spiders.
Well please remember what mom said, stay home and safe...there might be an icy spot
Mom and I love you all and are sending lots of hugs.


No comments:
Post a Comment