Monday, March 14, 2022

Flowering Rain Boots

 Playing with Stampin' Up!'s Flowering Rain Boots Bundle.

My first idea was to keep it simple....Can't wait to see what else happens with this stamp set.

I like the flower colors on the first one, but love the added design on the second one. We'll see what # 3 brings.


Here's what I did:

Thick Basic White Card Stock 5 1/2" x 8 1/2" scored at 4 1/4"

Smoky Slate Card Stock 3 7/8" x 5 1/8" attached to the card base using Stampin' Seal.

Basic White Card Stock 3 3/4" x 5" for the card front. Using the Butterflies and Flowers Layering Decorative Mask, sponge some Smoke Slate lightly in the center of this card. Remember very lightly.

On a scrap piece of Smoky Slate, die cut the decorative border and weave the Petal Pink ribbon that is in the Cotton Ribbon Combo Pack through it. Start at each end with a piece of decorative border with the ribbon and when you meet in the middle. Once I got the border tacked down Using Multi-Purpose Glue and Mini Glue dots to the left side of the card front, tie a bow. 

I stamped the various pieces of the design as follows. The message-  Flirty Flamingo Classic Ink. The Stem - Old Olive Classic Ink. Water Can - Smoky Slate Classic Ink. On the first card I stamped the flowers using Flirty Flamingo Classic Ink and the 2nd card I used Petal Pink Classic Ink.....Your choice. 

To make sure I knew where everything was going, I attached the Water Can with Stampin' Dimensionals first. I kept the Dimensionals towards the lower part of the design and then added the stems using Multi-Purpose Glue.  Attach the flowers using the Mini Stampin' Dimensionals and add to the top of the stems.

 Die cut the garden tool using Basic Gray and add to the card as shown of where you would like. 

We'll be creating a card in my April Stamp Class using this bundle....Something similar, but different. Does that even make sense?

Here is a list of the products I used. You can order through my 24/7 online store Here

Product List 


Have a great day and if you have any questions, please e-mail me at LDEstampin@yahoo.com.

Blessings
Lynda and Wiley the Wonder Dog M.D.


This is Wiley and his Idea of what Monday's look like. 


Friday, March 11, 2022

Wiley the Wonder Dog M.D.

 Hi Everybody

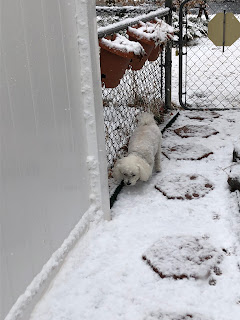
It's me Wiley the Wonder Dog M.D. and boy have I been busy. It's been so cold lately that mom can't leave me alone outside in case I'll freeze. It's not easy for a little boy dog to be out in the cold when I don't have any boots to wear. 

I never see mom or dad go outside without any boots, but oh no I can't have any. Here's a picture of me begging to come into the house to get my little toes warm.


Boy it was really cold huh. I heard it got below zero last night and I believe it. I'm so thankful I have a home to keep warm in. I know I am truly blessed, 
I'll be checking in every so often to let you know how I'm doing and how thankful I am for all that I have

Be thankful for all the things you've been given as I am.

Blessings and Love
Wiley the Wonder Dog M.D.


Thursday, March 10, 2022

Meet the Mini and a selection of Bundles that work with the Mini!


If you haven’t already, it’s time to meet your mini crafting companion: 

the Mini Stampin’ Cut & Emboss Machine is portable and easy to use.

This machine normally sells for $60.00 but for the month of March, it's on sale for $48.00.

 It’s the perfect pick for budding beginners who want to branch out, papercrafting pros who want to craft on the go, or those who are short on storage space! With this trusty tool, any crafter can make precise cuts and embossed designs for their projects with one pass.

Starting 1 March, you can snag the Mini Stampin’ Cut & Emboss Machine at a 20% discount! This miniature machine is compatible with a large selection of Stampin’ Up! embossing folders and dies. Build your craft collection and combine the Mini Stampin’ Cut & Emboss Machine with any (or all!) of the select stamp-and-die bundles that are also available for 20% off during the month of March!

Please note that items that can be purchased with the 50% off item Stampin’ Reward include full-priced items and regularly discounted stamp/tool bundles only. The 20% off the Mini Stampin’ Cut & Emboss Machine and the 20% off bundles that are part of the Savings Are in Bloom promotion are not available for purchase at 50% off the deeper discounted price.

Take your crafting to the next level—and encourage your customers to do the same. Keep reading for all the details about this discount!

Here are the Bundles that are on sale for 20% off also. 

Product List 


If you'd like to order any of these items, please click HERE to be re-directed to my 24/7 online store.

If you have any questions, please e-mail me at LDEstampin@yahoo.com
Blessings
Lynda Emerson


and Wiley the Wonder Dog M.D.


Wednesday, March 9, 2022

Flowering Tulips

 Created this Easter Basket for my Customers this month.


I used the Easter Friends Stamp Set from Stampin' Up and created this cute little basket. 
Here's how it was done.
Cut 2 pieces of Basic White Card Stock 1 3/8" x 3 7/8" 
and 2 pieces of Basic White Card Stock 1 3/8" x 1 7/8" 

Cut 2 piece the Penned Designer Series paper 1 3/4" x 3 3/4" and 2 pieces 1 1/4" x 1 3/4". 
Attach the DSP to the Basic White card stock pieces using Stampin' Seal or Multi-Purpose Glue and then attach to the Basket.

To create the handle for the basket, Cut 1 piece of the base color 2 1/2" x 9 3/4"
Cut 1 piece of Basic White Card Stock 2 3/8" x 9 3/4" and attach to the color base.
Cut 1 piece of matching Designer Series Paper 2 1/4" x 9 3/4" and attach to the basic White. 
Using Tear and tape and attach a piece to the bottom inside of each side, then attach another piece 1 1/4" add a piece of ribbon to the front of the handle. Tuck it under so the Tear and Tape will hod it down, then  attach to the center of the basket,
I stamped the Bunny from Easter Friends using Memento Tuxedo Black Ink and colored the bunny with Smoky Slate and colored his nose with Flirty Flamingo Stampin' Blends. Do a light coloring around the bunny using Pool Party. This highlights the little bunny. Die cut using the Layering Circles Dies


Using the 2nd largest die from the Tailor Made Tags, Cut one using the main Card Stock Color and attach to the front of the handle using Stampin' Dimensionals. Then attach to the tag using Dimensional.
Here are the items I used to create my baskets.


Fun project to purchase the items I used, please click HERE to be re-directed to my 24/7 online store.


Lynda Emerson
LDEstampin@yahoo.com
and Wiley the Wonder Dog M.D.