Friday, December 4, 2020

Friday Fun Day with the Pampered Pup Bundle


This was really a fun Friday card to create. I have been waiting and waiting to get this suite and when it became available and on sale yea, I grabbed it.

How much is that doggie in he Window!

Front of Card


Inside of Card


I think Wiley is going to love this card although he might be a little jealous that he's not on the front of the card. But here's how we created this card

Card base is 5 1/2" x 8 1/2" scored at 4 1/4".
Then, adhere a piece of 3 7/8" x 5 1/8" Real Red to the card base.
Using a piece of 3 3/4" x 5" piece of Whisper White Card Stock, die cut the paws on the bottom of the card. First center the 3 in the middle 
and then die cut the left side and then the right side. 
Using a piece of 1 1/4" x 3 3/4" Designer Series Paper adhere to the middle of the Whisper White card front.
Die cut the Stitched Circle Shape (2nd largest) and add to the center of the DSP with Dimensional. 
On a scrap piece of Whisper White Card Stock stamp the Dog with Memento and then color with the Crumb Cake Stampin' Blends. Die cut the dog with the appropriate die and add to the circle again with 
dimensionals.
Tie a little bow with the ribbon in the suite and then 
add one of the little heart trinkets also in the suite.

The inside is another piece of 3 7/8" x 5 1/8" Real Red Card Stock adhere to the inside and then add a piece of Whisper White Card stock and stamp the message and image using Memento Black and color with Real Red and Pool Party Stampin' Blends.

Here's What I used. 

Product List 

Thursday, December 3, 2020

Wiley's World Wednesday----Wiley Makes A Card- On the 2nd Day of Christmas

Well hello everybody
It's me Wiley The Wonder Dog M.D. and boy have I been busy. I think you're gonna love the card that I made all by myself...and here it is. And just in case you didn't know, it's really hard to do an origami fold when you only have 4 paws. I even had to stand on my head at one point to get that last fold in. 


Tomorrow mom will have the fold information, but what I really want to know is don't you think
 it's pretty cute. 
And you know what! Mom said that I could offer some
 FREE Snowflakes Sequins 
for placing an order in mom's online store.

Here's the deal. Place a $40.00 or more order in the month of December using hostess code. 
ABR6PAGC
And mom will put your name in a drawing for a pack of those really cute sequins that I used on my tree. She'll draw a name and let you know who wins. Remember this Hostess code is good for the month of 
December and some of the items in the August-December Catalog won't be there long....Don't miss out. Unfortunately, mom and I don't know what is coming or going but as soon as we do, you'll be the first to know....except mom and me.

Also, did you see that we are back to the 2nd day of Christmas? Mom started it a day earlier even though I told her NOT to, so now I've corrected her. 

Have a great day everybody and mom and I will see you tomorrow.
Love and blessings Wiley the Wonder Dog M.D. and mom.


Wednesday, December 2, 2020

Technique Tuesday - Another Really Cute Box

 Let's do another really cute box


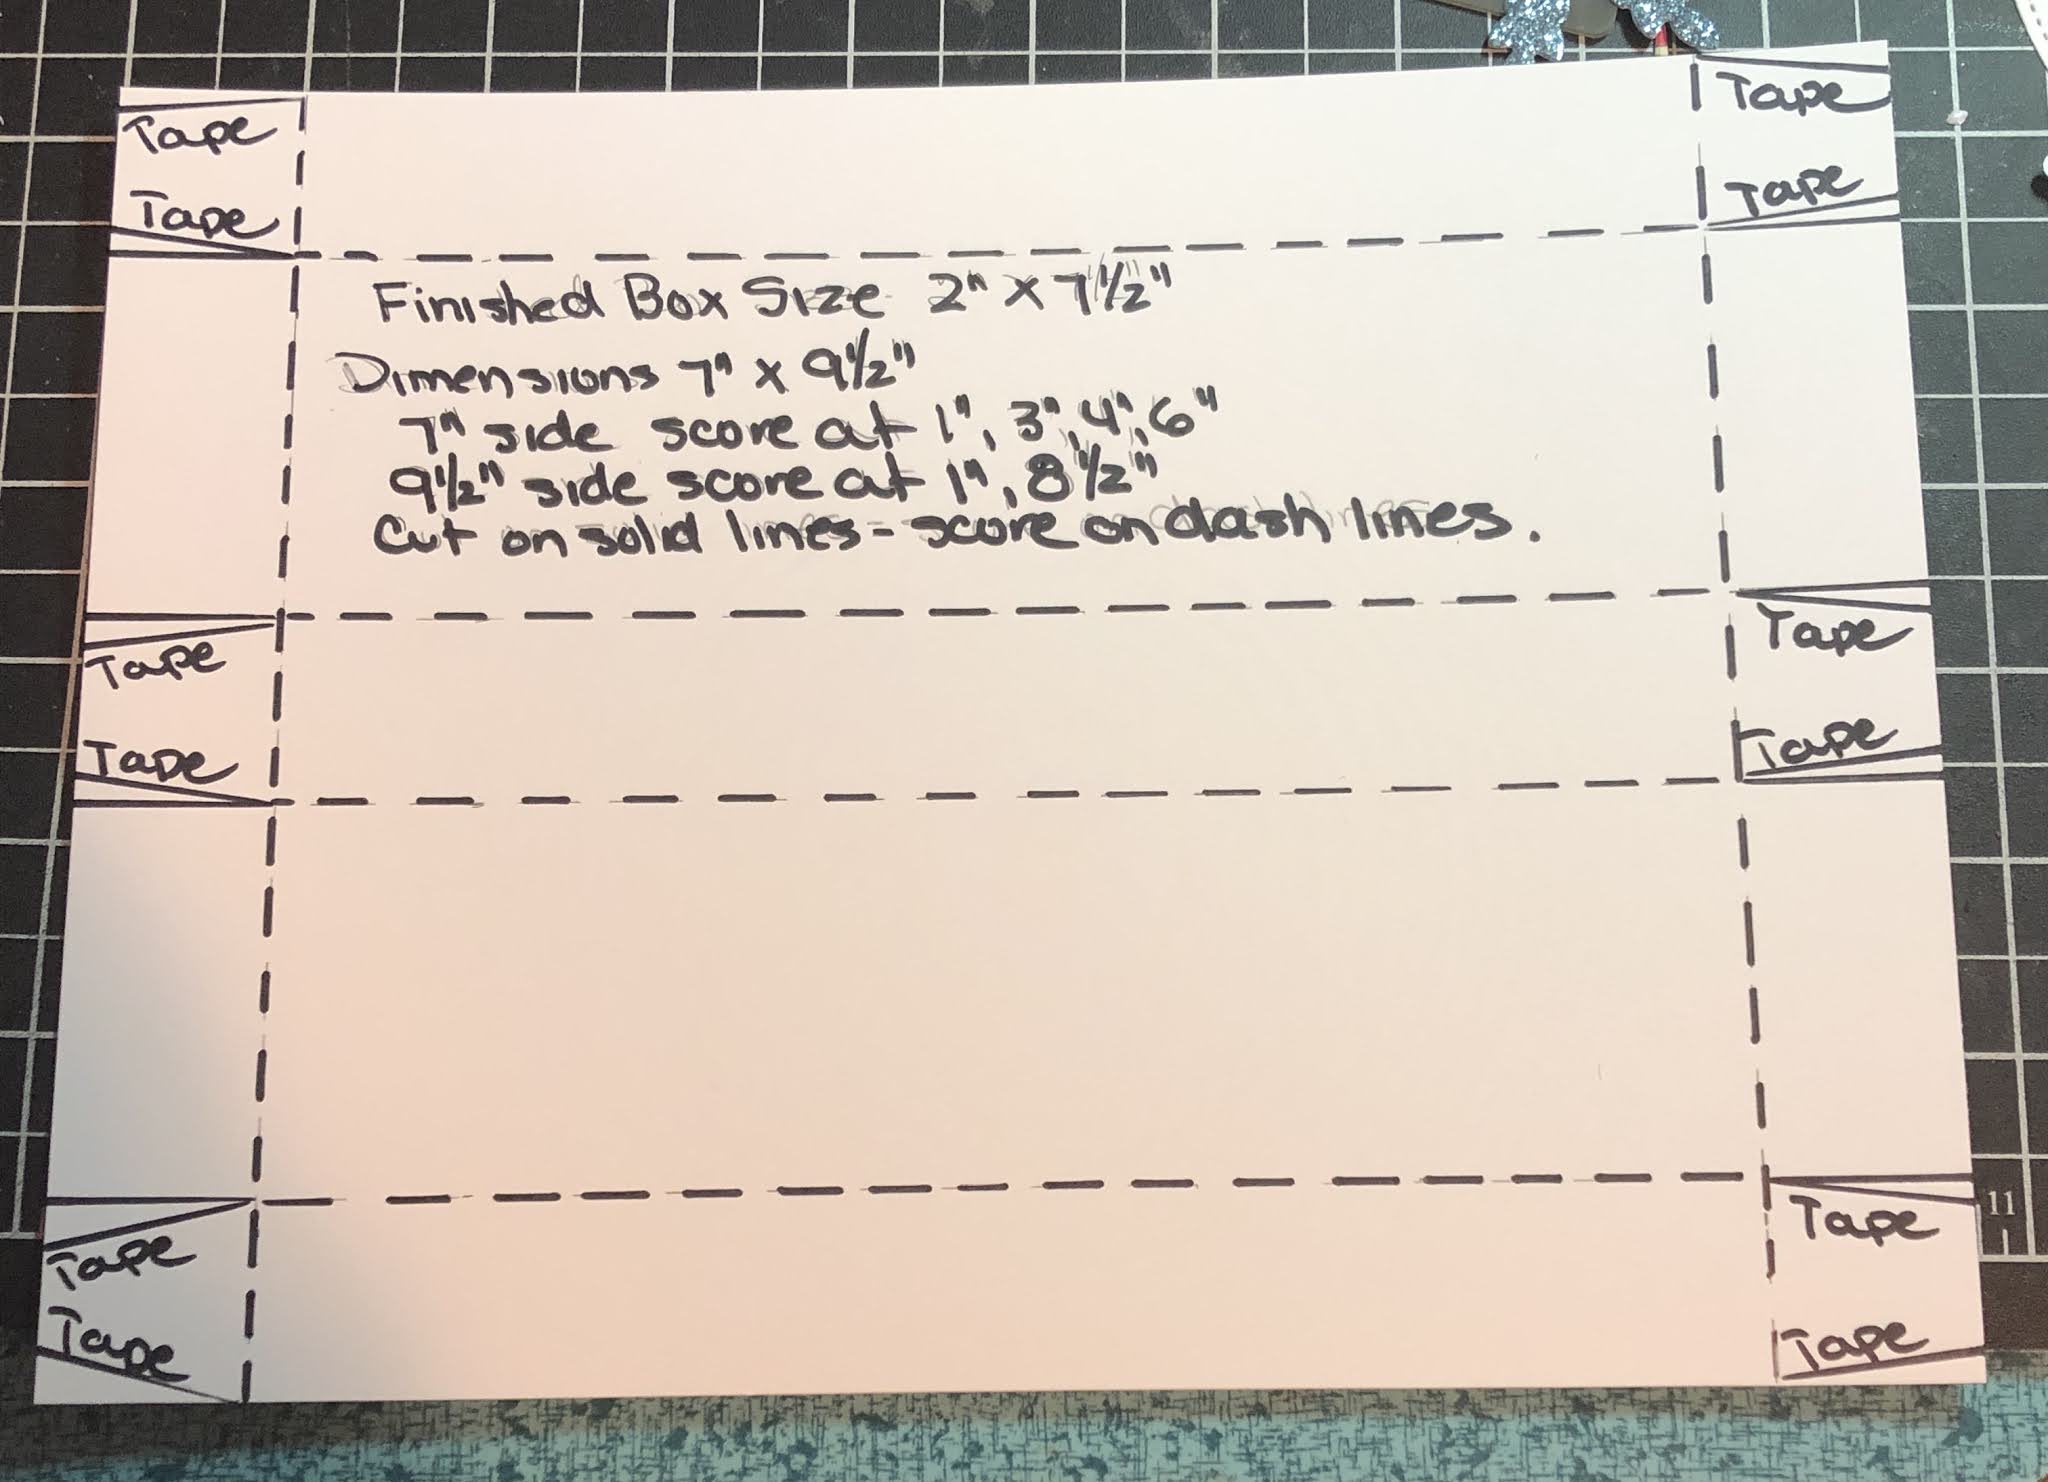
The finished size of this cute little box is 2" wide x 1" high x 7 1/2" long. And it might look familiar. The Designer Series Paper is Brightly Gleaming Specialty Designer Series Paper found in the August-December 2020 Mini Catalog. 

Here is the diagram to create this box. 


The Dimensions are 7" x 9 1/2"
Score the 7" side at 1", 3", 4" and 6".
the 9 1/2" size is scored at 1" an 8 1/2"
Cut on the solid lines and score on the dash lines. 
Add tape as indicated on the diagram. 
Tape the top part and the middle part to create the bottom of the box.
Tape the top part to create the lid. as shown in the diagram below.


The top of the box will then fit over the bottom sides of the box
This might seem a little confusing, but it will make sense once you start making the box.
I then attached the gold cord around the box and added one of the Bells from Sound of the Season dies.

Here is a list of the products I used to create these little box.
Please remember you can use any Designer Series Paper to create this cute box. I have not listed the dies I used because you can use any little tag you want. Plus oh my goodness, I just looked at my box again 
and the DSP is copper and the Bell is gold which is why I put in the product list copper 


Hope you have fun creating your little box. This would be cute for some candy, 
some tea light candles, etc. Add a little tissue paper to hold everything in place if you'd like. 


Have a wonderful day everybody
Blessings Lynda and Wiley the Wonder Dog M.D. 


Tuesday, December 1, 2020

On The Second Day of Christmas. I Gave A Hoot

 And the Owls make this card really cute.  I have to thank another demonstrator for this card. I mostly cased it and I apologize I didn't get her name but will have it soon. 


And here's what I did

1. Seaside Spray Card Stock 5 1/2" x 8 1/2" scored at 4 1/4" 
2. Whisper White Card Stock 3 3/4" x 5" embossed using the Winter Wonder Embossing Folder. 
     Attach to the card base using Stampin' Dimensionals.
3. Snowflake Splendor Designer Series Paper 3" x 3 3/4" adhere using the Stampin' Seal.
4. Adhere a piece of 3/8" x 3 3/4" Real Red Cardstock to the lower part of the DSP. 
5. On a scrap piece of Whisper White Card Stock stamp the Christmas Owls with Memento and 
    color  using the Stampin' Blends indicated on the list of items above....or choose your own colors. 
6. Attach the ring to the DSP by using Stampin' Seal where the owls are going to be adhered and
     a little where the mistletoe is going to be.
7, Attach the owls and the mistletoe using Stampin' Dimensional. 
8. Die cut the little branches using Pear Pizzaz  and attach with either Glue Dots or Stampin' Seal.
9. Make a bow using the red ribbon in All The Trimming Combo pack and attach above the 
    mistletoe using Mini Glue Dots.
10 Adhere a piece of  4" x 5 1/4" Whisper White Card stock on the inside and stamp the 
      Merry Christmas message with Real Red Classic Ink. 

I think that's got it.  To order any of these products, please visit my online store HERE and click 
on SHOP. I you order the bundle, I will send you the kit for FREE to Create this really cute card.